
Introduction
This is a guide made for beginners and those interested in having a guide that isn’t written by an idiot. Believe me, there’s a lot of bad guides out there. In this one I will try to do my best to make it as perfect as possible. If you see any mistakes at all in here or run into any issues, tell me please. Everything will be explained in depth. This guide is written for Linux users in mind. WSL (Windows Subsystem for Linux) may also work on this guide.
In this guide, we will be covering:
- Obtaining a VPS server from providers such as Vultr, Digital Ocean, etc… to name a few
- If using a VPS, some services provide the ability to include an SSH key
- Using a domain registrar to obtain a domain
- Adding records
- Preparing the server:
- SSH key usage and generation
- Daily updates
- Installing necessary programs
- Creating a swap space
- Extending bash history
- Setting up a firewall
- Configuring PHP for Word
- Creating a MySQL database for WordPress
- Downloading WordPress
- Configuring NGINX
- Installing WordPress
- Certifying the website for HTTPS (encryption)
- Future-proofing the server
1. Obtaining a Server
We have to host the website somewhere and on something. You can host this at home, however, this guide is more oriented towards using a VPS (virtual private server). A VPS is a server run by large server hosting services. They generally provide faster internet, reliability, and is in general cheaper as opposed to self-hosting your own server. If you do intend to host your own server, please have experience and proceed with caution. A VPS is a mostly risk-free way to establish your own website.
When choosing a VPS you must consider several things: Will the VPS host block the HTTP/HTTPS ports? How much is it? Where is it hosted? How much ram and storage should I get? Are they a reliable service that I can trust? Do they provide automatic backups or screenshots for my servers? Do they offer IPV4 addresses and IPV6 addresses? What operating systems do they provide?
For this server we will need HTTP and HTTPS ports unblocked. The server does not have to be powerful at all or use a lot of ram or storage – A common misconception. A website can work perfectly on a 500MB server with 10GB of storage. You may use more but it may be a waste of money. Snapshots are usually not required but are nice to have, especially when you plan to upgrade your server in the future or what-not.
With these being considered, I choose to host my VPS on Vultr.com. In some locations they provide $3.50 USD hosting for a 500MB server. This is an amazing deal and I recommend you use this for your server. You should also choose Debian 11 as that is the version this guide is written for.
SSH Keys on VPS Providers
Some VPS providers give the option for you to add your SSH key before you start the server. This is to provide you access to your server without the use of a root password by giving your computer a unique key. Think of it as logging into a server with an extremely complicated password that is saved on a file on your computer and every time you access the server it reads the complicated password.
To use this feature (and I heavily recommend you to use this feature), you will need to generate an ssh key. Do this by running:
ssh-keygen
Follow the instructions given for it to be generated. You can skip the adding a password part. This will generate an ssh key on your computer located in your home directory under the directory .ssh. It will create a file in that directory called id_rsa. If we run:
cat ~/.ssh/id_rsa
It will provide the entire ssh key in your terminal. Be careful with this! Do not give this key to anyone. On the VPS provider site, put this entire key in when it asks you for it.
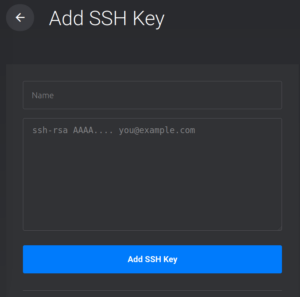
Insert the ssh key in your terminal into the large box
You will now be able to access the server without a root password on startup. Just make sure when creating the server to select the ssh key.
2. Using a Domain Registrar To Obtain a Domain
There are several services of domain registrars. You may pick any of them as they all pretty much provide the same service. I go with www.namecheap.com, however you can use whichever service. In this section, you should do your own research when it comes to domain registrars as it is less of a question of technology and more of a question on the business service provided.
As a definition I randomly searched up on Google says, “A domain name registrar is a business that handles the reservation of domain names as well as the assignment of IP addresses for those domain names.”. The domain registrar will be a way to publicly display your IP address in letters. That’s it. You do not even need a domain to host your website, you can simply connect with just your IP in the search bar in your web browser – but that is not what you want to do unless you seriously do not want to pay the ~$15 a year for the domain. You will not receive an encryption certificate either with just an IP, you will need a domain for that.
Adding Records
Once you get your domain registrar and purchased your domain, you will have to add “DNS Records”. The page should look similar to this:
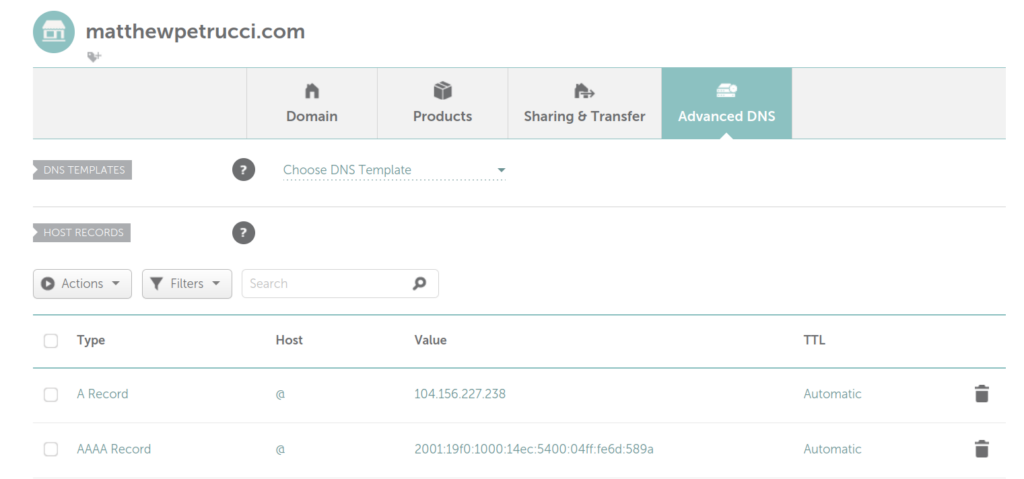
You will want to add a few records of a few types, though.
A Record – This will be the IPV4 address of your server
AAAA Record – This will be the IPV6 address of your server
Both the A and AAAA records should apply to all host values. That is why in the above picture it is an “@”.
CNAME Record – Your first CNAME record should have “www” in the host section, then your full domain in the “value section”. Example:

The CNAME Record will be used to ensure that anyone who types “www.matthewpetrucci.com” instead of “matthwepetrucci.com” will be redirected to “matthewpetrucci.com”.
With these records done, save the progress and continue on with the tutorial.
3. Preparing The Server
It’s time to open up your terminal and get to work. Now that the bureaucracy is out of the way, we can finally begin our frankenstein creation.
First things first, we want to ensure the server is fully updated and upgraded before we begin anything. Please do not keep a non-updated server. To update and upgrade our server, run:
apt update && apt upgrade -y
in the VPS part, if you did not create an ssh-key but instead were given a root password, we can create an ssh key and add it to the server. This will be super fast, easy, and I highly recommend you do this. We will then proceed to disable password logins, but this isn’t necessary and you can keep the ssh key along with the root password. I will cover both options – Using an ssh key and disabling the root password or just using the root password.
Option 1: Using an SSH Key
Congratulations, you chose the right option. Firstly you will need an ssh key to use on your computer. To generate one, open up the terminal and type:
ssh-keygen
Follow the instructions given for it to be generated. You can skip the adding a password part. This will generate an ssh key on your computer located in your home directory under the directory .ssh. Do not give your key to anyone. That directory is as important as a root password.
We will now need to add that ssh key to our server. We can do this simply by running the command:
ssh-copy-id root@youriphere
This will add your ssh key to your server after entering in your root password and credentials. Now if you connect to your server by running
ssh root@youriphere
Type yes to add the signature, and then you are in the server without the use of a password, just your ssh key!
Disabling the root password
Now that we have access to the server without the need for a root password, we have the option to remove the root password entirely. If you do not want to remove the root password, go to the Option 2 section and see how to handle securing a server without an ssh key.
To disable the root password, we will need to disable password login to the server. We will need to edit a file to do so. Let’s run:
nano /etc/ssh/sshd_config
This will bring us to the editor of our login configuration. We want to edit this value in the configuration to no:
PasswordAuthentication no
You may need to uncomment out a few lines by removing the # and/or change the values from yes to no for this to work. To reset the login authentication, we can run:
systemctl restart ssh
Now exit and we can verify that logging in with passwords will not work by running:
ssh -o PasswordAuthentication=yes -o PreferredAuthentications=keyboard-interactive,password -o PubkeyAuthentication=no root@youriphere
We should expect to get this:
Permission denied (publickey).
Congratulations, password login has now been disabled and your server is now only accessible through the ssh key on your device.
Option 2: Using Root Password
An unwise decision, but you have the freedom to be stupid in this world (of course there are exceptions to this, like with everything).
The simple additive to having this is that you will want to install fail2ban on the server. It is a program that will reject IP addresses that try and attempt to bruteforce your password. With fail2ban installed, the chances that your server will be bruteforced will be curbed heavily.
apt install fail2ban
Daily Updates
Having updates run daily is absolutely essential to a servers’ security and stability. To keep our server automatically updated, we can set a cronjob. A cronjob is a program that will run commands from a text file at given times – Say we want something to run every day, every tuesday, every three days, etc… That can all be done using crontab.
To add daily updates, ensure that you are logged in as root or are running this command as superuser (use sudo if you are a user). Then run:
crontab -e
It will give you a selection of editors. Use the editor you prefer. I use nano. When entering the crontab, we will be presented with something that looks like this:
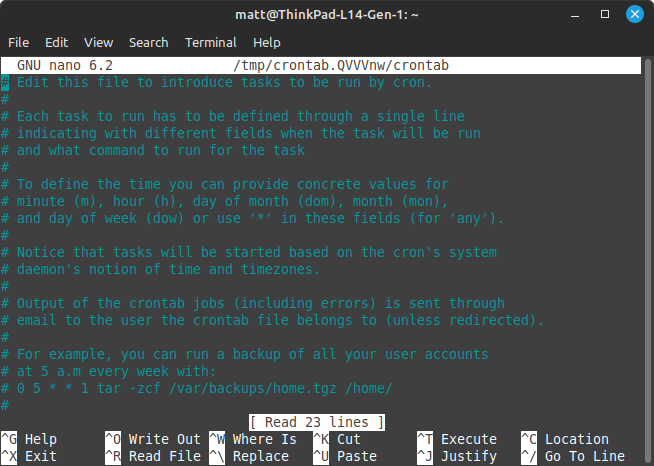
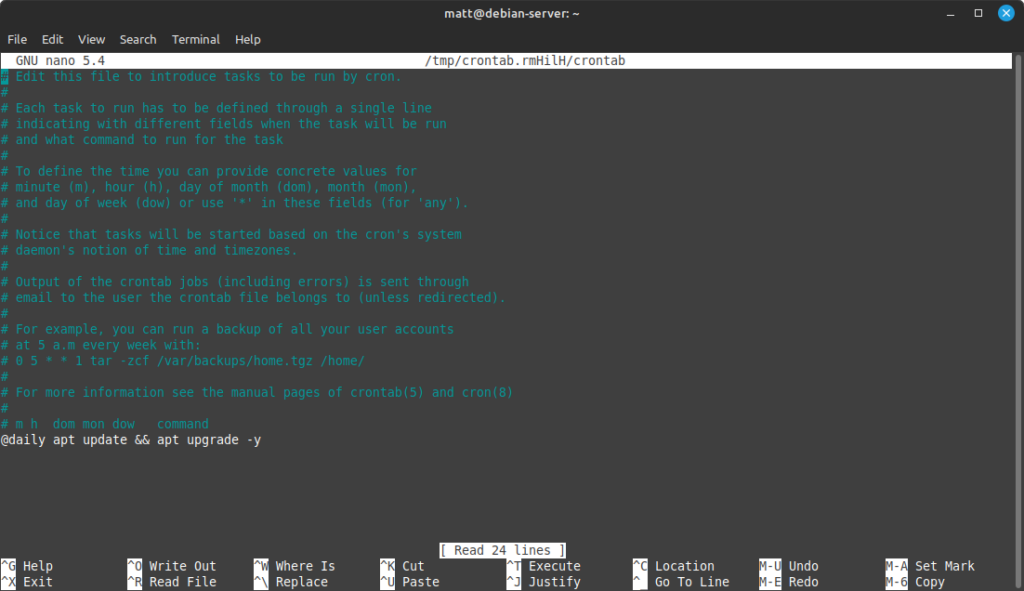
We then add the line to the crontab to make it update every day (you can add this at the top or the bottom of the commented section, I prefer the bottom):
@daily apt update && apt upgrade -y
Note: There are other ways to implement automatic updates. See: https://wiki.debian.org/UnattendedUpgrades
Installing Necessary Programs
We will need a bunch of packages for our server to host a WordPress server on the internet. The packages and command are as follows:
apt install nginx certbot python3-certbot-nginx php php-mysql php-fpm php-curl php-gd php-intl php-mbstring php-soap php-xml php-xmlrpc php-zip mariadb-server mariadb-clientWe have NGINX for our HTTP engine, Certbot for our HTTPS certification, PHP and a bunch of other PHP libraries for the WordPress server, and MariaDB for the MySQL server. With all of these installed, we are done downloading and installing necessary progams.
Creating a Swap Space
When I first created this website and uploaded a photo, it crashed PHP and hence the entire server. Luckily, I guessed correctly that it was the server running out of ram while processing the image. When a server runs out of ram, it screws things up and misses information, sometimes resulting in entire programs crashing. To prevent this, if the server uses too much ram the kernel will store ram in a designated swap space to be used later when active memory is available.
Creating a swap drive isn’t necessary, but is very recommended for a WordPress server. See my video here: https://youtu.be/3L8MiXuJS5Y
Note: You can change 0.5G to 1G or 2G depending on how much drive space you will have on your server.
fallocate -l 0.5G /swapfile && chmod 600 /swapfile && mkswap /swapfile && swapon /swapfile && echo '/swapfile none swap sw 0 0' | sudo tee -a /etc/fstab
Understanding how a swap file works is not the point of this guide so I decided to make it a quick one-liner that will work on Debian servers. You can just copy and paste this into your server and it will create a 512mb swap space for your memory.
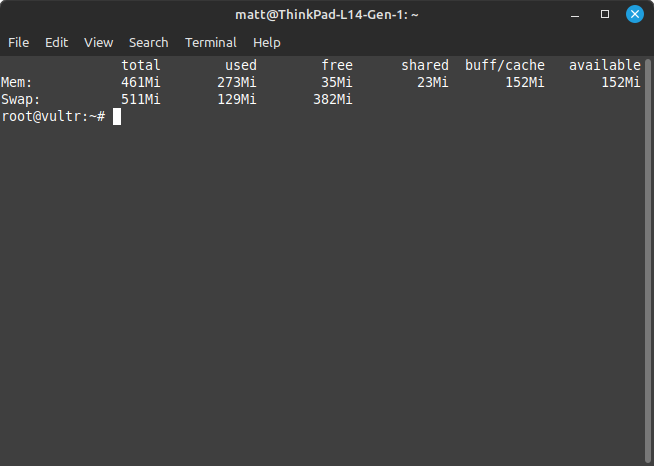
If we run free -h to see our memory, we can now see that it should look something like this:
Extending Bash History
Generally bash has defaults of keeping a moderate history size. You can see all commands previously entered into your server in /root/.bash_history. I like to extend this to have a good history so you can know exactly what you did and typed in from the beginning of the server. Here’s how:
nano /root/.bashrc
bashrc is the settings file (not exactly…) of bash. When you run bash as root, it runs whatever you put in there everytime it opens up bash. So, we want to extend our history. Put these lines into .bashrc at the very end:
# don't put duplicate lines or lines starting with space in the history.
# See bash(1) for more options
HISTCONTROL=ignoreboth

# append to the history file, don't overwrite it
shopt -s histappend

# for setting history length see HISTSIZE and HISTFILESIZE in bash(1)
HISTSIZE=1000000
HISTFILESIZE=2000000
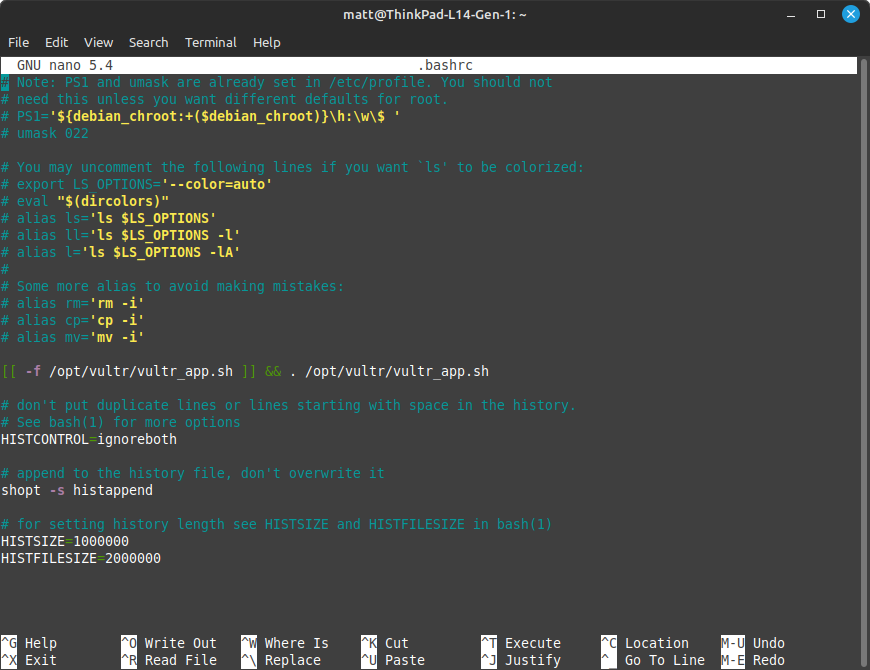
We will now have a huge bash history that will last forever. Every command entered will be saved upon a normal exit of the session (typing in exit into the terminal to leave the server rather than clicking X on the window).
Setting up a Firewall
A firewall is important for a servers security. We will be using the program ufw, named after “uncomplicated firewall”. The firewall will keep all ports closed but the ones we want open to enhance server seWIPcurity. First and foremost, always, always, always make sure that the first thing you unblock on the firewall is ssh! I have locked myself out of many servers by not doing this first:
apt install ufw
ufw allow ssh
ufw enable
ufw should already be enabled and have exceptions for ssh on most VPS providers. To allow HTTP and HTTPS on ufw for our website we will now run:
ufw allow http
ufw allow https
This will open the HTTP and HTTPS ports on our server so when we run nginx we will be able to see our website. In fact, you can probably already see it now. If you go to your domain (ensure that it is HTTP, not HTTPS in your search bar!) or your IP address, you should get a webpage that looks like this:
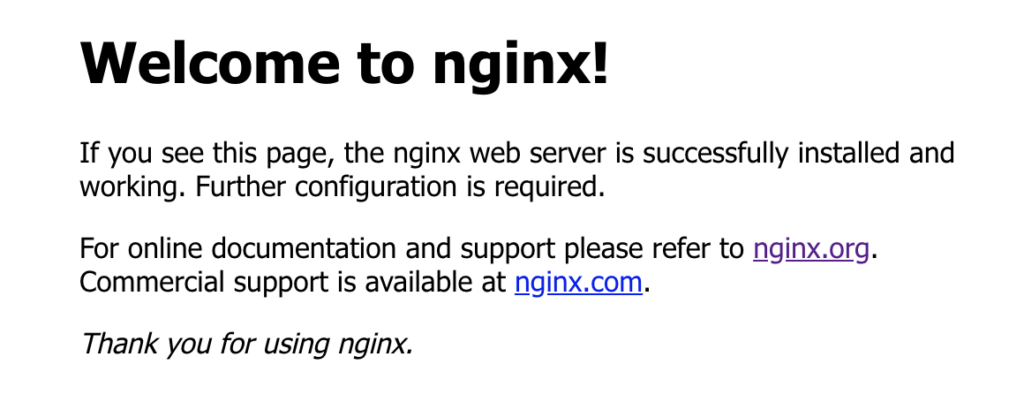
If you see this, it means the firewall is working, NGINX is working, our server is working, and (hopefully) your domain is working!
Note: Your domain registrar can take up to 24 hours to apply recent changes. Mine once took three hours.
Configuring PHP for WordPress
Lastly we want to configure our PHP settings for wordpress. We will go into the php configuration file by doing:
nano /etc/php/7.4/fpm/php.ini
Then we will proceed to change the following lines to the following values:
upload_max_filesize = 32M

post_max_size = 48M

memory_limit = 256M

max_execution_time = 600

max_input_vars = 1000

max_input_time = 400
You may change these to your liking, or keep the defaults. Now we will reload PHP to apply the changes:
systemctl restart php7.4-fpm.service
4. Creating a MySQL Database for WordPress
WordPress uses a database to store stuff, so we will need to set it up. It’s not that complicated and most of it is automated, so all you have to do is to create the user and database itself. Everything else you can rely on WordPress scripting.
Firstly, run:
mysql_secure_installation
Do not set a root password, remove anonymous users, disallow root login from the network, remove the test database, reload the privilege tables, and for the rest do all the recommended values.
Now we will create the database. We will first log in as root user to the database:
mysql -u root -p
Once inside the MySQL environment, run the commands and replace the strongpassword with a password that’s strong for you:
CREATE DATABASE wordpressdb;
GRANT ALL PRIVILEGES ON wordpressdb.* to wordpressuser@localhost IDENTIFIED BY 'strongpassword';
FLUSH PRIVILEGES;
EXIT
We are now pretty much done with the database part up to the setup of WordPress.
5. Downloading WordPress
NGINX, our HTTP engine, needs something to host. This step will provide the HTML, javascript and PHP code provided by WordPress for the engine to host.
First things first is we need to put this in the right directory. Change directory to where we will keep all our website files:
cd /var/www/html/
We will first begin by googling “wordpress download” and going to the first page: https://en-ca.wordpress.org/download/
Next what we are looking for is a direct link to the file itself on the website. The reason being we are going to run the command wget to download it. If we get the wrong page, we might accidentally download an HTML and javascript file. If we scroll down, we can see this section:
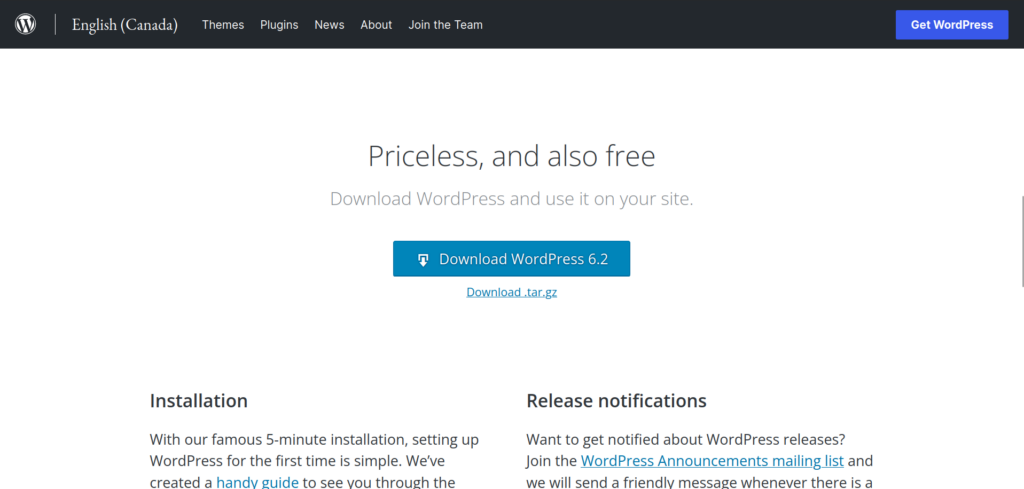
Right click on either direct link (I prefer the tar.gz, but you can also get the .zip), and copy the url. Go to the terminal, and run this:
wget {right click the url here}
It should be this:
wget https://en-ca.wordpress.org/latest-en_CA.tar.gz
Now depending on whether you have the tar.gz or the .zip, we will run either:
tar -xzvf latest-en_ca.tar.gz
Note: if unzip doesn’t work, you may have to install it with apt install unzip, then run the command.
When you run ls -a in the /var/www/html directory, you should get the file wordpress, its compressed version, and the NGINX index. Delete the index and the compressed version, you don’t need them anymore (use rm command followed by the name of the index and the compressed file).
Note: Some tutorials have you edit the configuration inside the WordPress folder for your database information. You don’t need to do this now as it is also done for you in the installer it provides.
Lastly we need to change the permissions so NGINX will be able to access these files. We can do this by running these commands:
chown -R www-data:www-data /var/www/html/wordpress
chmod -R 775 /var/www/html/wordpress
Now NGINX has full access, permission and ownership to these directories.
6. Configuring NGINX
After this part, you may be able to begin using your WordPress service.
I will give a basic explanation how nginx works:
In /etc/nginx, there are two folders: sites-available and sites-enabled. These hold the website configurations. The configurations in sites-enabled are linked to the configurations in sites-available, meaning that the same file in sites-available will also appear in sites-enabled. They’re the same file in two directories.
Firstly what we’re going to do is remove the default configuration from sites-enabled. Secondly we need to create our own config:
nano /etc/nginx/sites-available/wordpress.conf
We are going to want to use this configuration I made that works for IPV4 and IPV6. Note: The PHP version may change in a new release of Debian, so if you upgrade Debian and the website doesn’t work, it may be because “php7.4” in the configuration file won’t work due to an upgrade in Debian packages. it might need to be changed to “php8.4” or something, depending on the version Debian uses in their next release. Be sure to change it if your website doesn’t work when upgrading the server! Replace yourwebsitehere with your websites domain in the configuration file.
server {
listen 80;
listen [::]:80;
root /var/www/html/wordpress;
index index.php index.html index.htm;
server_name yourwebsitehere.com www.yourwebsitehere.com;
error_log /var/log/nginx/yourwebsitehere.com_error.log;
access_log /var/log/nginx/yourwebsitehere.com_access.log;

client_max_body_size 100M;
location / {
try_files $uri $uri/ /index.php?$args;
}
location ~ \.php$ {
include snippets/fastcgi-php.conf;
fastcgi_pass unix:/run/php/php7.4-fpm.sock;
fastcgi_param SCRIPT_FILENAME $document_root$fastcgi_script_name;
}
}
Info about the configuration file: The listen section has it listen on both IPV4 and IPV6 ports. The root shows the directory of the website data and code. Index is the initial page, and the rest is PHP jargon (if it isn’t already self-explanatory like server_name).
Next we want to link this configuration file to sites-enabled. Make sure it is the full directory of the file you want to link. If you are in the directory and just mention the file, it will not work. Example being ln -s wordpress.conf /etc/nginx/sites-enabled/ will NOT work. It must be:
ln -s /etc/nginx/sites-available/wordpress.conf /etc/nginx/sites-enabled/
To test if your configuration file is correct and NGINX works, run:
nginx -t
Everything should be in working order. To apply the changes, we have to restart NGINX:
systemctl restart nginx.service
After restarting NGINX, your website should now be up and running on your domain. You should see it pop up!
7. Installing WordPress
Go to your domain and go through the installer. At this point the training wheels are off the bicycle and you can go ahead and do what you please. It should be a simple installer. I mean, you set up an entire website through a terminal, you should be able to do a graphical installer without a tutorial.
8. Certifying The Website for HTTPS (Encryption)
We will be using a bot for this as actually certifying it is apparently very hard and the bot can do it in under ten seconds. This will allow HTTPS connection to your server without getting the “insecure connection” page.
We will run:
certbot --nginx -d www.yourdomainhere.com -d yourdomainhere.com
Go through the installer and voila, it will change the files in /etc/nginx/sites-available to generate SSL certificates.
8. Future-Proofing The Server
Everything in this section is entirely optional and not necessary for the function of your server, but it is necessary for the protection and future function of your server to ensure it runs perfectly fine without issues.
In the crontab, I generally add this line to my websites:
@daily certbot renew -w /var/www/html/wordpress --quiet && systemctl reload nginx
This ensures that certbot will always renew the website. Certbot already automatically renews websites with its own timer but this is just a bulletproof way to ensure that it will always be certified and renewed. In the section section where we reload NGINX, it is to ensure that NGINX does not have any issues. You may also add “systemctl reload php7.4-fpm.service” to the crontab to reload PHP every day as well, however I never tried this and it would be experimental to do so.
Debian 11’s end of life will be between 2024 and 2026, however there is also an extended end of life where only security updates are pushed – it is maintained by third parties and not supported by the Debian team. When you upgrade follow a tutorial and ensure that you have a backup. It can destroy your entire server, but I never had it happen to me personally.
That is pretty much it. Your website server should be perfectly ready! You have now hosted your own WordPress website. Enjoy!